Snacking is a splendid way to keep your energy tiers up at some point of the day, however it's important to make smart alternatives when it comes to your coronary heart health. on this weblog, we are able to explore ten scrumptious and coronary heart-wholesome snacks that are clean to make and will leave you feeling glad and nourished. these snacks are full of nutrients, low in unhealthy fats and sodium, and are designed to aid a healthy coronary heart. permit's dive in and discover those tasty treats!
1. **mixed Berry Parfait:**
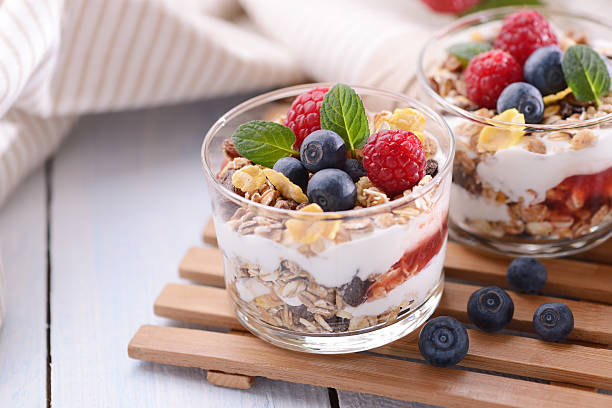
This fresh snack is rich in antioxidants and fiber. In a pitcher or bowl, layer low-fats yogurt, a mix of sparkling berries (strawberries, blueberries, raspberries), and a sprinkle of granola. Repeat the layers and top it off with a drizzle of honey. it's an excellent stability of sweetness and tanginess. in terms of wholesome and pleasant snacks, few options are as pleasant as a combined berry parfait. This clean and nutrient-packed treat combines the natural sweetness of berries with the creaminess of yogurt and the crunch of granola. on this weblog, we'll discover the stairs to create an ideal combined berry parfait, at the side of pointers on gadget, appropriate activities, and an in depth recipe to guide you thru the technique. Get equipped to indulge in a guilt-free, flavorful delight!
**system needed:**
1. Glass or bowl for layering
2. Spoon for blending and serving
**appropriate occasions:**
- Breakfast: revel in a parfait to kickstart your day with a burst of power and essential nutrients.
- Snack: This parfait makes a exceptional snack to satisfy your cravings between food.
- Dessert: provoke your guests with an stylish and healthy dessert alternative.
**training Time:**
The instruction time for a combined berry parfait is about 10-15 mins, depending at the number of layers and the favored intricacy.
**Recipe:**
1. gather Your ingredients:
- fresh combined berries (e.g., strawberries, blueberries, raspberries)
- Low-fat or Greek yogurt (plain or flavored)
- Granola (select your favorite range)
- Honey (optional, for drizzling)
- fresh mint leaves (for garnish, optionally available)
2. put together the Berries:
- Wash the berries thoroughly underneath cold water and gently pat them dry with a paper towel.
- Slice strawberries into chunk-sized pieces and depart smaller berries like blueberries and raspberries whole. This provides texture to the parfait.
3. Layer the Parfait:
- start with the aid of spooning a layer of yogurt into the bottom of your glass or bowl. the quantity relies upon on the size of your serving vessel.
- add a layer of mixed berries on pinnacle of the yogurt. set up them flippantly to make sure a balanced distribution of flavors.
- Sprinkle a layer of granola over the berries. This affords a delightful crunch and provides texture to the parfait.
- Repeat the layers until you attain the preferred amount, making sure every layer is visible for an attractive presentation.
4. final Touches:
- If preferred, drizzle a small amount of honey over the pinnacle layer to enhance the sweetness.
- Garnish the parfait with a twig of fresh mint leaves for a burst of freshness and visual appeal.
5. Serving and taking part in:
- Serve the blended berry parfait right now after guidance to revel in the contrasting textures of creamy yogurt, juicy berries, and crunchy granola.
- Use an extended spoon to scoop thru the layers, ensuring every chew captures a chunk of every factor.
- take a seat returned, relax, and savor the fresh flavors of this nutritious and pleasing deal with.
A combined berry parfait isn't simplest a scrumptious snack or breakfast option however additionally a dinner party for the eyes. With the vibrant colorings, creamy yogurt, and layers of sweet berries and crunchy granola, it's a treat this is positive to thrill your taste buds and nourish your frame. via following the easy steps mentioned in this weblog, you may be able to create a beautiful combined berry parfait it really is suitable for diverse events. So, seize your favorite berries, yogurt, and granola, and embark on a journey of pleasant flavors and healthful indulgence!
2. **Avocado Toast with Tomato and Basil:**

Avocado is a heart-healthful fruit packed with healthful fat. Mash ripe avocado and unfold it on entire-grain toast. top with sliced tomatoes, clean basil leaves, a squeeze of lemon juice, and a sprinkle of sea salt. This snack is loaded with nutrients, minerals, and fiber. Avocado toast has turn out to be a famous breakfast and snack preference for its simplicity and health advantages. adding fresh tomatoes and basil takes this conventional dish to an entire new stage of taste and freshness. in this blog, we're going to discover the steps to create a scrumptious avocado toast with tomato and basil, at the side of recommendations on device, suitable events, and an in depth recipe to guide you through the procedure. Get geared up to revel in a pleasing and nutritious treat!
**gadget needed:**
1. Toaster or toaster oven
2. Knife for slicing and spreading
3. slicing board
4. mixing bowl
5. Fork for mashing
6. non-compulsory: lemon juicer or fork for squeezing lemon juice
**suitable occasions:**
- Breakfast: begin your day on a healthful word with a fulfilling avocado toast.
- Brunch: provoke your visitors with a flavorful and visually attractive brunch choice.
- Snack: experience this nutritious snack whenever you want a short and attractive select-me-up.
**coaching Time:**
The guidance time for avocado toast with tomato and basil is about 10-15 minutes, relying on your selected level of ripeness for the avocado.
**Recipe:**
1. acquire Your elements:
- Ripe avocados
- Slices of whole-grain bread (choose your favored variety)
- clean tomatoes (ideally ripe and flavorful)
- clean basil leaves
- Lemon juice (non-compulsory, to save you avocado from browning)
- Salt and pepper to flavor
2. prepare the Avocado:
- Slice the avocados in 1/2 lengthwise and remove the pit.
- Scoop out the flesh with a spoon right into a blending bowl.
- Mash the avocado with a fork until it reaches your desired consistency. some pick a easy texture, at the same time as others pick it barely chunky.
3. Toast the Bread:
- Toast the slices of bread for your preferred stage of crispness the use of a toaster or toaster oven. hold an eye fixed on them to prevent burning.
4. gather the Toast:
- once the bread is toasted, spread a beneficiant quantity of the mashed avocado onto every slice.
- Slice the tomatoes into thin rounds and set up them on pinnacle of the avocado.
- Tear or thinly slice the fresh basil leaves and sprinkle them over the tomatoes.
- Squeeze a bit of lemon juice over the avocado to prevent it from browning (non-compulsory).
- Season with salt and pepper to flavor.
5. Serving and taking part in:
- Serve the avocado toast with tomato and basil at once after practise to maintain the freshness of the ingredients.
- reduce the toast into halves or quarters for simpler coping with.
- experience the creamy avocado, juicy tomatoes, and fragrant basil flavors mixed with the pleasing crunch of the toasted bread.
Avocado toast with tomato and basil is a easy yet pleasant dish this is ideal for breakfast, brunch, or a brief snack. The creamy texture of avocado, paired with the freshness of tomatoes and the fragrant essence of basil, creates a harmonious combo of flavors. via following the steps mentioned on this blog, you could easily prepare this nutritious and delicious toast. So, grasp your favored bread, ripe avocados, and fresh produce, and bask in a scrumptious treat that will go away you feeling glad and nourished.
3. **Hummus-stuffed Cucumber Bites:**

Slice cucumbers into thick rounds and scoop out a small properly inside the center. Fill every cucumber round with a spoonful of homemade or keep-bought hummus. Garnish with chopped parsley or paprika. Cucumbers are hydrating, at the same time as hummus gives protein and fiber. seeking out a healthful and flavorful appetizer it's both fresh and pleasing? look no similarly than avocado hummus-crammed cucumber bites. these delightful chunk-sized treats combine the creaminess of avocado hummus with the crunch of cucumber, presenting a burst of flavors and textures in every bite. on this blog, we will manual you via the stairs to create those delicious bites, offering recommendations on equipment, appropriate occasions, and a detailed recipe with explanations to make sure your fulfillment. Get prepared to affect your visitors with this wholesome and engaging appetizer!
**equipment wished:**
1. Knife for cutting and spreading
2. reducing board
3. blending bowl
4. Spoon or fork for mashing
5. Small spoon or piping bag (optional, for filling the cucumber bites)
6. Toothpicks (optional, for securing the bites)
**appropriate activities:**
- Appetizer: Serve those cucumber bites as an appetizer at events, gatherings, or as part of a meal.
- healthy Snack: experience them as a fresh and nutritious snack any time of the day.
**practise Time:**
The coaching time for avocado hummus-stuffed cucumber bites is about 20-30 minutes, depending for your chopping and filling speed.
**Recipe:**
1. gather Your elements:
- Ripe avocados
- Cucumber (choose a company and fresh one)
- Canned chickpeas (drained and rinsed)
- Garlic cloves (peeled and minced)
- fresh lemon juice
- Tahini (optional, for brought taste)
- floor cumin
- Paprika
- Salt and pepper to taste
- optional toppings: chopped clean herbs (parsley, cilantro), crimson pepper flakes, or sesame seeds
2. prepare the Avocado Hummus:
- In a mixing bowl, combine the tired chickpeas, mashed avocados, minced garlic, lemon juice, tahini (if using), ground cumin, paprika, salt, and pepper.
- Use a spoon or fork to mash and mix the components collectively till properly combined and smooth. adjust the seasoning in line with your taste preferences.
3. put together the Cucumber:
- Wash the cucumber thoroughly beneath cold water and pat it dry with a towel.
- Slice the cucumber into rounds, every approximately 1-1.five inches thick.
- the usage of a small spoon or a piping bag, scoop out the middle of every cucumber spherical to create a hole space for the filling. make sure no longer to move all the manner through the cucumber to retain its form.
4. Fill the Cucumber Bites:
- Spoon the avocado hummus mixture into the hollowed-out cucumber rounds, filling them generously.
- Optionally, garnish the stuffed cucumber bites with chopped clean herbs, pink pepper flakes, or sesame seeds for delivered visual appeal and taste.
5. Serving and enjoying:
- set up the avocado hummus-filled cucumber bites on a platter or serving tray.
- If favored, at ease every chunk with a toothpick to keep them intact and cause them to less difficult to deal with.
- Serve right away and revel in those fresh and healthy bites.
Avocado hummus-filled cucumber bites are a lovely and nutritious appetizer a good way to impress your visitors and leave them trying greater. The creamy and flavorful avocado hummus perfectly complements the fresh crunch of the cucumber, growing a harmonious stability of textures and tastes. through following the stairs outlined in this blog, you can easily create this appetizer for numerous events. So, seize your knife, cutting board, and sparkling ingredients, and embark on a adventure of creating those flavorful and wholesome bites a good way to be successful at any collecting or a pleasing treat for yourself.
4. **Greek Yogurt with Berries and Almonds:**

Greek yogurt is a protein-rich snack that promotes coronary heart fitness. top a serving of undeniable Greek yogurt with fresh berries and a handful of almonds. The yogurt provides probiotics, while berries provide antioxidants. Greek yogurt with berries and almonds is a simple yet satisfying breakfast option that provides a burst of flavors and a wealth of nutritional benefits. The creamy and tangy Greek yogurt pairs perfectly with the sweetness of fresh berries and the crunch of almonds, creating a delightful combination that will energize your day. In this blog, we will guide you through the steps to create this nutritious breakfast, providing tips on equipment, suitable occasions, and a detailed recipe with explanations to ensure your success. Get ready to indulge in a wholesome and delicious morning treat!
**Equipment Needed:**
1. Bowl for serving
2. Spoon for mixing and serving
3. Cutting board
4. Knife for slicing almonds (optional)
5. Measuring cup (optional, for portioning ingredients)
**Suitable Occasions:**
- Breakfast: Enjoy Greek yogurt with berries and almonds as a fulfilling and nutritious start to your day.
- Snack: This versatile dish can also be enjoyed as a quick and healthy snack.
**Preparation Time:**
The preparation time for Greek yogurt with berries and almonds is approximately 5-10 minutes, depending on how quickly you can assemble the ingredients.
**Recipe:**
1. Gather Your Ingredients:
- Greek yogurt (choose your preferred fat content and brand)
- Fresh berries (such as strawberries, blueberries, raspberries, or a mix)
- Almonds (whole or sliced, raw or toasted)
- Optional toppings: honey, maple syrup, chia seeds, or granola
2. Prepare the Berries and Almonds:
- Rinse the fresh berries under cold water and pat them dry with a towel. If needed, slice larger berries into smaller pieces.
- If using whole almonds, you can choose to leave them as they are or slice them for easier eating.
3. Assemble the Greek Yogurt Bowl:
- Take a serving bowl and spoon a generous amount of Greek yogurt into it.
- Spread the yogurt evenly across the bottom of the bowl to create a smooth base.
4. Add the Berries and Almonds:
- Scatter the fresh berries over the Greek yogurt, distributing them evenly.
- Sprinkle the almonds on top of the berries, adding a satisfying crunch to the dish.
5. Optional Toppings and Sweeteners:
- Drizzle honey or maple syrup over the yogurt bowl for added sweetness, if desired.
- Sprinkle chia seeds or granola on top to provide extra texture and nutrition.
6. Mixing and Enjoying:
- Using a spoon, gently mix the ingredients together, ensuring that the yogurt coats the berries and almonds.
- Take a moment to appreciate the vibrant colors and textures in your bowl.
- Grab a spoon and savor each spoonful of the creamy yogurt, juicy berries, and crunchy almonds.
Greek yogurt with berries and almonds is a delightful and nutritious breakfast or snack that will leave you feeling satisfied and nourished. The combination of creamy yogurt, sweet berries, and crunchy almonds creates a harmonious balance of flavors and textures. By following the steps outlined in this blog, you can easily create this delicious and wholesome dish. So, grab your favorite Greek yogurt, fresh berries, and crunchy almonds, and enjoy a nutritious start to your day or a refreshing snack that will keep you energized and satisfied.fiber, and almonds add a fulfilling crunch.
5. **Quinoa Salad with Roasted veggies:**

cook dinner quinoa consistent with bundle instructions and allow it cool. Toss the cooked quinoa with a combination of roasted greens like bell peppers, zucchini, and cherry tomatoes. Drizzle with a easy vinaigrette made with lemon juice, olive oil, and herbs. Quinoa is a entire protein, and the veggies offer crucial nutrients and minerals. Quinoa salad with roasted veggies is a healthful and delicious dish that mixes the nutty flavor of quinoa with the wealthy, caramelized flavors of roasted veggies. full of nutrients, this salad gives a fulfilling and balanced meal option. in this weblog, we can guide you through the stairs to create this nutritious salad, imparting recommendations on equipment, appropriate activities, and a detailed recipe with explanations to make sure your achievement. Get equipped to embark on a culinary journey and take pleasure in the pleasant mixture of quinoa and roasted veggies!
**gadget needed:**
1. Baking sheet for roasting greens
2. blending bowl for making ready the salad
3. Saucepan with a lid for cooking quinoa
4. Whisk or fork for preparing the dressing
5. Knife for slicing vegetables
6. cutting board
7. Serving bowl or plate
**suitable events:**
- Lunch or Dinner: This quinoa salad may be served as a main route for a light lunch or dinner.
- Potlucks or Gatherings: deliver this salad to potlucks or gatherings as a healthful and flavorful contribution.
- Meal Prep: prepare this salad earlier for a few days' really worth of nutritious lunches.
**coaching Time:**
The practise time for quinoa salad with roasted veggies is about 30-forty mins, such as cooking and cooling instances.
**Recipe:**
1. collect Your substances:
- Quinoa (white, purple, or a combination)
- assorted greens for roasting (such as bell peppers, zucchini, eggplant, cherry tomatoes, and crimson onions)
- Olive oil
- Salt and pepper to flavor
- fresh herbs for garnish (together with parsley or basil)
2. Roast the vegetables:
- Preheat your oven to 425°F (220°C).
- Wash and chop the vegetables into chunk-sized pieces.
- Toss the chopped greens with olive oil, salt, and pepper on a baking sheet, ensuring they may be lightly coated.
- Roast the greens inside the preheated oven for approximately 20-25 minutes or till they're tender and slightly caramelized. Stir them once or twice all through the cooking procedure to make certain even browning.
3. cook the Quinoa:
- Rinse the quinoa below bloodless water to remove any bitterness.
- In a saucepan, integrate the rinsed quinoa with water or vegetable broth the usage of a 2:1 ratio (two components liquid to 1 element quinoa).
- carry the aggregate to a boil, then reduce the warmth to low, cowl the saucepan with a lid, and permit it simmer for 15 mins or until the quinoa is fluffy and the liquid is absorbed.
- do away with the saucepan from warmth and let the quinoa cool for a couple of minutes.
4. prepare the Dressing:
- In a small bowl, whisk collectively the elements for the dressing. you may use a aggregate of olive oil, lemon juice, Dijon mustard, minced garlic, salt, and pepper. modify the flavors according to your choice.
5. assemble the Salad:
- In a huge blending bowl, integrate the cooked quinoa and roasted vegetables.
- Drizzle the dressing over the quinoa and greens, gently tossing to coat everything frivolously.
- taste and alter the seasoning if wanted.
- Garnish the salad with sparkling herbs for added freshness and aroma.
6. Serving and taking part in:
- transfer the quinoa salad with roasted greens to a serving bowl or plate.
- Serve it at room temperature or chilled, according to your desire.
- This salad can be enjoyed as a standalone meal or served along grilled protein or a aspect of vegetables.
Quinoa salad with roasted veggies is a nutritious, flavorful, and flexible dish that can be enjoyed as a major path or a aspect dish. by means of following the steps mentioned on this weblog, you could create a scrumptious and wholesome salad this is full of nutrients and bursting with flavors. The mixture of nutty quinoa and caramelized roasted greens creates a lovely stability of textures and tastes. So, collect your ingredients, preheat your oven, and get prepared to take pleasure in a nourishing and satisfying quinoa salad with roasted veggies.
6. **Smashed Chickpea Salad Wraps:**

Mash canned chickpeas with a fork and blend with diced celery, crimson onion, chopped parsley, lemon juice, and a touch of tahini. Season with salt, pepper, and cumin. unfold the aggregate onto whole-grain wraps and upload lettuce or spinach. This protein-packed snack is each pleasant and flavorful. Quinoa smashed chickpea salad wraps are a refreshing and satisfying meal option that combines the protein-packed goodness of quinoa and chickpeas with a medley of fresh vegetables and flavorful herbs. Wrapped in a whole-grain tortilla, these wraps are a perfect choice for a quick lunch, picnic, or on-the-go meal. In this blog, we will guide you through the steps to create this delicious plant-based dish, providing tips on equipment, suitable occasions, and a detailed recipe with explanations to ensure your success. Get ready to savor the flavors and textures of these wholesome quinoa smashed chickpea salad wraps!
**Equipment Needed:**
1. Saucepan with a lid for cooking quinoa
2. Mixing bowl for preparing the salad
3. Fork for smashing the chickpeas
4. Knife for chopping vegetables
5. Cutting board
6. Tortilla wraps
7. Optional: Sandwich press or grill pan for toasting the wraps
**Suitable Occasions:**
- Lunch: These wraps make a satisfying and nourishing lunch option.
- Picnics or Outdoor Gatherings: Pack these wraps for a delightful picnic or as a portable meal for outdoor gatherings.
- Meal Prep: Prepare the salad in advance and assemble the wraps whenever you're ready to enjoy a quick and healthy meal.
**Preparation Time:**
The preparation time for quinoa smashed chickpea salad wraps is approximately 30 minutes, including cooking and assembly.
**Recipe:**
1. Gather Your Ingredients:
- Cooked quinoa (white, red, or a mix)
- Canned chickpeas, rinsed and drained
- Assorted vegetables (such as bell peppers, cucumber, carrots, and red onion), finely chopped
- Fresh herbs (such as cilantro or parsley), chopped
- Lemon juice (from fresh lemons)
- Olive oil
- Salt and pepper to taste
- Whole-grain tortilla wraps
2. Cook the Quinoa:
- Rinse the quinoa under cold water to remove any bitterness.
- In a saucepan, combine the rinsed quinoa with water or vegetable broth using a 2:1 ratio (two parts liquid to one part quinoa).
- Bring the mixture to a boil, then reduce the heat to low, cover the saucepan with a lid, and let it simmer for 15 minutes or until the quinoa is fluffy and the liquid is absorbed.
- Remove the saucepan from heat and let the quinoa cool for a few minutes.
3. Prepare the Smashed Chickpea Salad:
- In a mixing bowl, add the rinsed and drained chickpeas.
- Using a fork, smash the chickpeas until they are partially mashed but still have some texture.
- Add the chopped vegetables, fresh herbs, lemon juice, olive oil, salt, and pepper to the bowl.
- Mix everything together until well combined. Adjust the seasoning according to your taste preferences.
4. Assemble the Wraps:
- Lay a tortilla wrap flat on a clean surface.
- Spoon a generous amount of the quinoa smashed chickpea salad onto the center of the tortilla.
- Fold in the sides of the tortilla, then roll it up tightly from the bottom to form a wrap.
- Optional: If desired, you can toast the wraps in a sandwich press or grill pan for a few minutes to add a warm and slightly crispy texture.
5. Serving and Enjoying:
- Transfer the wraps to a serving plate and slice them in half, if desired.
- These wraps can be enjoyed immediately or refrigerated for a few hours before serving.
- Serve them as a complete meal or pair them with a side salad or roasted veggies for a well-rounded meal.
Quinoa smashed chickpea salad wraps are a delightful and nutritious option for a quick and satisfying meal. By following the steps outlined in this blog, you can create a flavorful and plant-based dish that is rich in protein, fiber, and essential nutrients. The combination of quinoa, smashed chickpeas, and fresh vegetables provides a satisfying texture and a burst of flavors. So, gather your ingredients, prepare the salad, assemble the wraps, and enjoy the goodness of these quinoa smashed chickpea salad wraps, whether it's for lunch, a picnic, or a convenient on-the-go meal.
7. **Roasted Edamame:**
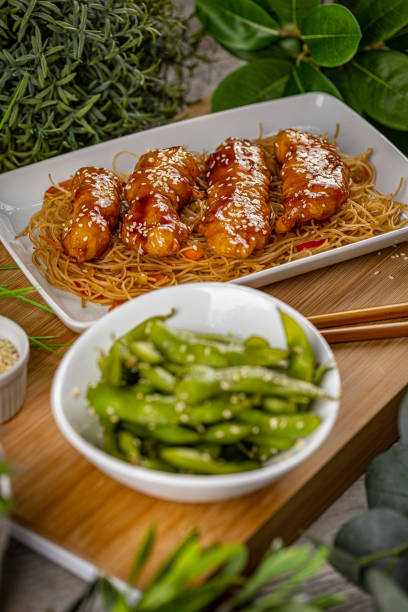
Toss frozen edamame with a touch olive oil, sea salt, and garlic powder. unfold them on a baking sheet and roast at 400°F (200°C) for about 15-20 mins till golden and crispy. Edamame is high in protein and fiber, making it a coronary heart-healthy snack choice. Roasted edamame is a nutritious and flavorful snack that is not only delicious but also easy to prepare. Edamame, young soybeans, are rich in protein, fiber, and essential nutrients. When roasted, they become crispy and addictive, making them an excellent alternative to traditional snacks. In this blog, we will guide you through the steps to create roasted edamame, providing tips on equipment, suitable occasions, and a detailed recipe with explanations to ensure your success. Get ready to enjoy a protein-packed and guilt-free snack with roasted edamame!
**Equipment Needed:**
1. Baking sheet for roasting the edamame
2. Mixing bowl for tossing the edamame
3. Colander for draining and rinsing the edamame
4. Paper towels for patting dry
5. Optional: Seasoning shaker or ziplock bag for coating the edamame with spices
**Suitable Occasions:**
- Snack Time: Roasted edamame is an excellent option for a healthy and satisfying snack.
- Movie Nights: Instead of reaching for unhealthy snacks, enjoy a bowl of roasted edamame during movie nights.
- Parties or Gatherings: Serve roasted edamame as a nutritious and crowd-pleasing appetizer at parties or gatherings.
**Preparation Time:**
The preparation time for roasted edamame is approximately 10 minutes, while the cooking time may vary depending on the desired level of crispiness.
**Recipe:**
Here's a step-by-step guide to creating roasted edamame:
1. Gather Your Ingredients:
- Frozen edamame (in the pods or shelled)
- Olive oil
- Salt
- Optional: Additional seasonings of your choice (such as garlic powder, chili powder, or smoked paprika)
2. Prepare the Edamame:
- If using edamame in the pods, blanch them in boiling water for 5 minutes, then drain and rinse with cold water. Pat them dry with paper towels.
- If using shelled edamame, simply rinse them under cold water and pat them dry.
3. Season and Coat the Edamame:
- In a mixing bowl, toss the edamame with olive oil until they are evenly coated. The oil helps the seasonings adhere to the beans.
- Add salt and any additional seasonings of your choice to the bowl. Adjust the amount of salt and seasonings according to your taste preferences.
- For convenience, you can also place the edamame, oil, salt, and seasonings in a seasoning shaker or ziplock bag and shake gently to evenly coat the edamame.
4. Roast the Edamame:
- Preheat your oven to 425°F (220°C).
- Spread the seasoned edamame in a single layer on a baking sheet.
- Place the baking sheet in the preheated oven and roast the edamame for 15-20 minutes, or until they become crispy and slightly golden.
- Shake or stir the edamame once or twice during the cooking process to ensure even roasting.
5. Serving and Enjoying:
- Remove the roasted edamame from the oven and let them cool for a few minutes.
- Serve them in a bowl or airtight container.
- Roasted edamame can be enjoyed warm or at room temperature.
Additional Tips:
- Experiment with different seasonings to create unique flavor profiles. Consider adding spices like cumin, paprika, or nutritional yeast for a savory twist.
- If you prefer a spicier snack, sprinkle cayenne pepper or red pepper flakes over the edamame before roasting.
- Store any leftover roasted edamame in an airtight container at room temperature for up to a week.
Roasted edamame is a simple and nutritious snack that offers a satisfying crunch and a protein boost. By following the steps outlined in this blog, you can create a delicious and wholesome snack that can be enjoyed at any time. The roasting process brings out the natural flavors of the edamame while adding a delightful crispiness. So, gather your ingredients, preheat your oven, and get ready to enjoy a bowl of irresistible roasted edamame.
8. **Veggie and Bean Quesadillas:**

Unfold mashed black beans onto a whole-grain tortilla. pinnacle with sautéed bell peppers, onions, and spinach. Sprinkle with a small quantity of vegan cheese and fold the tortilla in half. cook on a skillet until both facets are golden and the cheese has melted. This snack gives an excellent balance of protein, fiber, and greens. Veggie and bean quesadillas are a fantastic option for a quick and satisfying meal that is packed with flavors and nutrients. These quesadillas feature a delicious combination of sautéed vegetables, protein-rich beans, and melted cheese, all folded inside a warm tortilla. In this blog, we will guide you through the steps to create veggie and bean quesadillas, providing tips on equipment, suitable occasions, and a detailed recipe with explanations to ensure your success. Get ready to enjoy a mouthwatering and nutritious meal with these scrumptious quesadillas!
**Equipment Needed:**
1. Skillet or frying pan for sautéing the vegetables and cooking the quesadillas
2. Spatula for flipping the quesadillas
3. Knife and cutting board for chopping the vegetables
4. Grater for shredding the cheese
5. Optional: Quesadilla maker or panini press for even cooking and pressing the quesadillas
**Suitable Occasions:**
- Lunch or Dinner: Veggie and bean quesadillas make for a satisfying and complete meal.
- Game Nights: Prepare these quesadillas as a delicious and shareable snack during game nights or gatherings.
- Potlucks or Parties: Serve these quesadillas as a vegetarian option that will please a crowd.
**Preparation Time:**
The preparation time for veggie and bean quesadillas is approximately 15-20 minutes, while the cooking time is around 10 minutes.
**Recipe:**
1. Gather Your Ingredients:
- Tortillas (whole wheat or corn)
- Assorted vegetables of your choice (such as bell peppers, onions, mushrooms, zucchini, or spinach)
- Canned beans (black beans, pinto beans, or kidney beans), rinsed and drained
- Shredded cheese (cheddar, Monterey Jack, or a Mexican blend)
- Olive oil
- Salt and pepper to taste
- Optional: Spices or seasonings of your choice (such as cumin, chili powder, or garlic powder)
2. Sauté the Vegetables and Beans:
- Heat a skillet or frying pan over medium heat and add a drizzle of olive oil.
- Add the chopped vegetables to the pan and sauté until they are tender and slightly caramelized.
- Season the vegetables with salt, pepper, and any desired spices for added flavor.
- Add the rinsed and drained beans to the skillet and cook for an additional few minutes until they are heated through.
3. Assemble the Quesadillas:
- Place a tortilla on a clean surface or cutting board.
- Spoon a portion of the sautéed vegetables and bean mixture onto one half of the tortilla.
- Sprinkle a generous amount of shredded cheese over the vegetables.
- Fold the tortilla in half, pressing gently to seal the filling inside.
4. Cook the Quesadillas:
- Heat the skillet or frying pan over medium heat and add a drizzle of olive oil.
- Carefully place the folded quesadilla onto the skillet and cook for about 2-3 minutes on each side, or until the tortilla is golden brown and the cheese is melted.
- Repeat the process for the remaining tortillas and filling.
5. Serving and Enjoying:
- Transfer the cooked quesadillas to a cutting board and let them cool for a minute.
- Cut each quesadilla into wedges using a knife or pizza cutter.
- Serve the quesadillas hot with your favorite dipping sauces, such as salsa, guacamole, or sour cream.
Additional Tips:
- Customize your quesadillas by adding ingredients like diced tomatoes, corn kernels, or chopped fresh herbs like cilantro or parsley.
- Experiment with different types of tortillas, such as whole wheat, corn, or gluten-free options, based on your dietary preferences.
- To achieve a crispy texture, you can brush the tortillas with a little olive oil before cooking or use a quesadilla maker or panini press to achieve uniform heat distribution and pressing.
Veggie and bean quesadillas are a delicious and versatile meal option that combines the goodness of vegetables, beans, and melted cheese inside a warm tortilla. By following the steps outlined in this blog, you can create a satisfying and wholesome dish that can be enjoyed for lunch, dinner, or as a delightful snack. The sautéed vegetables and seasoned beans provide a burst of flavors, while the melted cheese adds a comforting and creamy element. So, gather your ingredients, heat up your skillet, and get ready to indulge in the irresistible goodness of veggie and bean quesadillas.
9. **Almond Butter and Banana Bites:**

Slice a ripe banana into chunk-sized rounds. spread almond butter on each banana slice and pinnacle with a sprinkle of chia seeds or beaten almonds. The mixture of healthful fat, fiber, and natural sweetness makes this a fulfilling snack. Almond butter and banana bites are a simple and nutritious snack that combines the creaminess of almond butter with the natural sweetness of bananas. These bite-sized treats are not only delicious but also packed with nutrients, making them an ideal option for a quick energy boost or a satisfying dessert. In this blog, we will guide you through the steps to create almond butter and banana bites, providing tips on equipment, suitable occasions, and a detailed recipe with explanations to ensure your success. Get ready to enjoy a delightful and guilt-free snack with these tasty bites!
**Equipment Needed:**
1. Cutting board and knife for slicing the bananas
2. Small spoon or butter knife for spreading almond butter
3. Optional: Toothpicks or small skewers for serving
**Suitable Occasions:**
- Snack Time: Enjoy almond butter and banana bites as a quick and nourishing snack throughout the day.
- Breakfast or Brunch: Serve these bites alongside your morning meal for a healthy start to the day.
- Party Platters: Arrange these bites on a platter for a nutritious and eye-catching addition to your party spread.
**Preparation Time:**
The preparation time for almond butter and banana bites is approximately 10-15 minutes.
**Recipe:**
1. Gather Your Ingredients:
- Ripe bananas (preferably medium-sized and not overly ripe)
- Almond butter (or any nut butter of your choice)
- Optional toppings: Chopped nuts, shredded coconut, cinnamon, or dark chocolate chips
2. Prepare the Bananas:
- Start by peeling the bananas and slicing them into bite-sized rounds, about 1/2 inch thick.
3. Spread Almond Butter:
- Take a banana slice and using a small spoon or butter knife, spread a thin layer of almond butter on one side of the slice.
4. Add Toppings:
- If desired, sprinkle your favorite toppings onto the almond butter layer. You can use chopped nuts for added crunch, shredded coconut for a touch of sweetness, a dash of cinnamon for warmth, or even a few dark chocolate chips for a decadent twist.
5. Assemble the Bites:
- Take another banana slice and place it on top of the almond butter and toppings, creating a small sandwich.
- Repeat the process for the remaining banana slices.
6. Serve and Enjoy:
- You can serve the almond butter and banana bites as is or secure each bite with a toothpick or small skewer for easy handling and presentation.
- Arrange the bites on a serving plate and enjoy them immediately.
Additional Tips:
- Choose ripe but firm bananas for easier slicing and handling.
- Feel free to experiment with different nut butters, such as peanut butter or cashew butter, to suit your preferences.
- Get creative with toppings by using chia seeds, hemp seeds, granola, or drizzling a little honey for added sweetness.
Almond butter and banana bites are best enjoyed fresh. However, if you have any leftovers, you can store them in an airtight container in the refrigerator for up to 2 days. Keep in mind that the bananas may become softer over time. Almond butter and banana bites are a delightful combination of creamy almond butter and naturally sweet bananas. By following the steps outlined in this blog, you can easily create a healthy and satisfying snack that can be enjoyed at any time. The versatility of this recipe allows you to customize the bites with your favorite toppings and experiment with different nut butters for added variety. So, grab your knife, bananas, and almond butter, and indulge in the deliciousness of almond butter and banana bites a perfect blend of flavors and nutrition!
10. **Roasted Beet Chips:**
 for 15-20 minutes until crispy")
Slice clean beets thinly and toss them with olive oil, salt, and your preferred herbs or spices. set up the slices on a baking sheet and roast at 375°F (190°C) for 15-20 minutes until crispy. Beet chips are a nutritious opportunity to store-offered potato chips, imparting vitamins, minerals, and antioxidants. Roasted beet chips are a nutritious and flavorful snack that mixes the herbal sweetness of beets with a satisfying crunch. those selfmade chips aren't only scrumptious however also filled with vital vitamins and minerals. in this blog, we can manual you thru the steps to create crispy roasted beet chips, offering hints on gadget, suitable occasions, and a detailed recipe with motives to ensure your achievement. Get geared up to take pleasure in a guilt-unfastened and vibrant snack so that it will leave your taste buds happy!
**gadget needed:**
1. Chef's knife and reducing board for reducing the beets
2. Mandoline slicer or vegetable peeler for attaining skinny, uniform slices
3. massive mixing bowl for tossing the beet slices with oil and seasonings
4. Baking sheets or parchment paper for baking the chips
5. elective: Cooling rack for allowing the chips to chill and become more crispy
**suitable events:**
- Snack Time: enjoy roasted beet chips as a healthful and nutritious snack between meals.
- Appetizers: Serve these chips as an appetizing and colorful addition to celebration platters or gatherings.
- wholesome aspect Dish: Pair roasted beet chips with your favored dip or sauce as a more fit alternative to traditional potato chips.
**guidance Time:**
The education time for roasted beet chips is approximately 15-20 mins, relying on the quantity of chips you're making.
**Recipe:**
1. collect Your components:
- sparkling beets (select beets which might be firm and have clean pores and skin)
- Olive oil or any cooking oil of your desire
- Salt and pepper, or any preferred seasonings (such as garlic powder, paprika, or dried herbs)
2. put together the Beets:
- Wash the beets thoroughly to do away with any dirt or debris.
- the use of a chef's knife, trim off the beet greens and roots.
- Peel the beets using a vegetable peeler or depart the pores and skin on for brought texture and nutrients.
- Slice the beets into skinny, even rounds using a mandoline slicer or a sharp knife. purpose for slices which can be around 1/16 to 1/eight inch thick.
3. Toss with Oil and Seasonings:
- area the beet slices in a huge mixing bowl and drizzle them with olive oil, ensuring all of the slices are gently covered.
- Sprinkle salt, pepper, and any preferred seasonings over the beet slices. Toss lightly to flippantly distribute the oil and seasonings.
4. Bake the Beet Chips:
- Preheat your oven to 325°F (163°C).
- Line baking sheets with parchment paper or gently grease them.
- set up the seasoned beet slices in a single layer at the baking sheets, making sure they don't overlap.
- vicinity the baking sheets in the preheated oven and bake for approximately 20-25 minutes, or till the chips are crispy and slightly golden around the edges. maintain a close eye on them to prevent burning.
5. Cool and experience:
- as soon as the chips are accomplished baking, remove them from the oven and let them cool at the baking sheets for a couple of minutes. this will assist them crisp up in addition.
- For an additional crispy texture, transfer the chips to a cooling rack and allow them to cool absolutely.
Extra recommendations:
- it is crucial to slice the beets as uniformly as possible to make certain even cooking. A mandoline slicer can help attain constant thickness.
- if you pick a sweeter flavor, you can sprinkle a little little bit of cinnamon or maple syrup at the beet slices earlier than baking.
- experience loose to test with extraordinary seasonings to add variety. Smoked paprika, cumin, or dried rosemary can upload depth and complexity to the taste profile.
Preservation:
Roasted beet chips are nice loved straight away after baking to preserve their crispiness. but, if you have leftovers, shop them in an airtight box at room temperature for up to two days. remember the fact that the chips can also lose some of their crispiness over time.
Roasted beet chips are a satisfying and nutritious alternative to standard potato chips. through following the steps mentioned in this weblog, you may without problems create crispy and flavorful beet chips so as to fulfill your snack cravings. revel in them on their very own or pair them together with your preferred dips or sauces for brought enjoyment. So, seize some fresh beets, preheat your oven, and take pleasure in the deliciousness of homemade roasted beet chips—a healthful snack in order to go away you looking greater!
Those ten heart-healthy snacks prove that nourishing your body can be each delicious and fun. whether or not you are seeking out a short bite between food or planning a nutritious party spread, these alternatives have you ever covered. do not forget to pay attention for your body's starvation cues and pick snacks that align along with your nutritional desires. with the aid of incorporating those snacks into your routine, you may aid your heart fitness at the same time as savoring every scrumptious bite.