**Sushi vs. Sashimi: Unraveling the delicacies of eastern delicacies**
With regards to jap delicacies, two popular dishes that frequently create confusion are sushi and sashimi. at the same time as they both characteristic raw fish, there are wonderful variations in their instruction, presentation, and flavors. on this blog, we are able to delve into the nuances of sushi and sashimi, highlighting their specific characteristics and helping you apprehend the key differences between those scrumptious culinary delights.
**1. Sushi: The art of Vinegared Rice and Fish:**
Sushi is a eastern dish that consists of vinegared rice combined with a variety of substances including uncooked or cooked fish, seafood, greens, or even omelet. right here are some key points about sushi:
- Rice Base: Sushi is characterized via the usage of sushi rice, which is brief-grain rice seasoned with vinegar, sugar, and salt. The rice is the foundation of the dish and offers a slightly tangy and sticky texture.
- sort of components: Sushi gives countless opportunities in relation to fillings. common alternatives encompass uncooked fish (such as tuna, salmon, or yellowtail), cooked seafood (like shrimp or crab), veggies (like cucumber or avocado), and different ingredients like pickled radish or tamago (sweet omelet).
- Presentation: Sushi is frequently presented as bite-sized rolls (maki), hand-pressed nigiri (a small mound of rice topped with fish or different elements), or as toppings on oval-shaped beds of rice called gunkan (generally used for substances like roe or sea urchin).
- Accompaniments: Sushi is commonly served with soy sauce, wasabi (a highly spiced inexperienced paste crafted from japanese horseradish), and pickled ginger. these condiments decorate the flavors and offer a stability of warmth and tanginess.
**2. Sashimi: purely uncooked Delicacy:**

Sashimi, on the other hand, is a jap delicacy that includes thinly sliced, uncooked seafood or fish without any rice. here are some key points approximately sashimi:
- raw Seafood recognition: Sashimi is all about showcasing the herbal flavors and textures of the raw fish or seafood. It allows the elements to shine in their purest shape.
- simple Presentation: Sashimi is usually offered as thinly sliced portions of fish or seafood arranged artfully on a plate. the focus is at the visible enchantment of the fish and its natural shade and texture.
- No Rice: in contrast to sushi, sashimi does not consist of rice. alternatively, it relies completely on the freshness and pleasant of the raw components.
- Dipping Sauce: Sashimi is normally served with a dipping sauce called soy-based totally ponzu or soy sauce with wasabi. The sauce enhances the flavors of the seafood with out overpowering them.
**3. The important thing differences:**
- Rice Presence: Sushi continually includes vinegared rice, even as sashimi does now not have any rice.
- style of components: Sushi gives a extensive range of factor alternatives past raw fish, at the same time as sashimi focuses totally on uncooked seafood or fish.
- Presentation style: Sushi is often offered as rolls, nigiri, or gunkan, at the same time as sashimi showcases the sliced fish or seafood in a minimalist and visually attractive way.
Sushi and sashimi are both beloved dishes in jap cuisine, however they differ in their education, presentation, and the inclusion of rice. Sushi emphasizes the combination of vinegared rice and numerous elements, at the same time as sashimi highlights the natural taste of raw seafood with none rice. by means of information these differences, you may recognize and experience those culinary delights for his or her unique flavors and textures. whether you decide upon
**A: Sushi: The artwork of Rice and Seafood**
Sushi is a dish that mixes vinegared rice with an expansion of elements, together with raw or cooked seafood, veggies, and on occasion even tropical culmination. The rice utilized in sushi is pro with a aggregate of rice vinegar, sugar, and salt, giving it a slightly tangy and sweet taste.
**Exploring the Different Types of Sushi**
Shushi, the beloved Japanese dish, has gained immense popularity worldwide for its exquisite flavors and artistic presentation. While most people associate sushi with the iconic rolls wrapped in seaweed, there are actually various types of sushi that offer unique textures, tastes, and dining experiences. In this blog, we'll take you on a flavorful journey, exploring the different types of sushi and the delightful ingredients that make each one special.
**1. Nigiri Sushi: The Art of Simplicity**
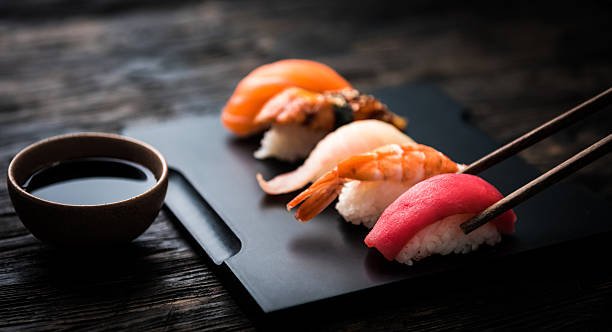
Nigiri sushi is the quintessential sushi experience. It consists of a small mound of sushi rice topped with a slice of fresh fish or other ingredients. The simplicity of nigiri allows the flavors and textures of the fish to shine. Popular toppings for nigiri include:
- Maguro (Tuna): With its deep red color and tender texture, maguro is a classic choice for nigiri sushi.
- Sake (Salmon): Sake offers a rich, buttery taste and a vibrant orange color that adds visual appeal to the sushi.
- Ebi (Shrimp): Boiled or lightly grilled shrimp provides a delicate and slightly sweet flavor.
Nigiri sushi is a traditional and stylish form of sushi that allows the flavors of sparkling fish or different toppings to polish. The sensitive stability between seasoned sushi rice and the cautiously selected toppings makes Nigiri sushi a true culinary pride. on this blog, we will delve into the sector of Nigiri sushi, exploring recommendations on how to make it, the device used, and the step-by means of-step manner. Get ready to elevate your sushi-making talents and impress your taste buds with the high-quality flavors of selfmade nigiri sushi.
**1. Equipments Used:**
a) Sushi Rice Cooker: A sushi rice cooker guarantees perfectly cooked, fluffy rice with the right consistency and stickiness.
b) Sushi Mat (Makisu): A bamboo sushi mat is used to shape and roll the nigiri sushi.
c) Sharp Knife: a sharp, non-serrated knife is important for reducing the fish or other toppings with precision.
d) Sushi Rice Paddle (Shamoji): This flat, wooden paddle is used to mix and gently spread the sushi rice.
**2. ingredients:**
a) Sushi Rice: the inspiration of nigiri sushi, sushi rice is a short-grain rice that is seasoned with a combination of rice vinegar, sugar, and salt.
b) clean Fish or Toppings: conventional nigiri sushi is frequently crowned with slices of uncooked fish which include tuna, salmon, or yellowtail. however, you could also use cooked seafood, such as shrimp or eel, or even non-seafood toppings like omelet or tofu for vegetarian alternatives.
c) Soy Sauce and Wasabi: these condiments are generally served alongside nigiri sushi for dipping and adding an additional kick of flavor.
**3. Step-with the aid of-Step guide:**
a) put together the Sushi Rice:
- Rinse the sushi rice under bloodless water till the water runs clean.
- prepare dinner the rice in keeping with the producer's instructions in a sushi rice cooker.
- as soon as cooked, transfer the rice to a massive bowl and allow it cool for a few minutes.
- In a small bowl, blend rice vinegar, sugar, and salt until dissolved.
- Drizzle the vinegar mixture over the rice and lightly fold it in using a rice paddle, being cautious now not to mash the rice.
b) Form the Nigiri:
- moist your fingers with water to save you the rice from sticking. Take a small handful of sushi rice and lightly form it into an oval or square mound the use of mild stress.
- Dab a small quantity of wasabi on pinnacle of the rice, if desired.
- vicinity a slice of fish or topping over the rice, making sure it covers the rice completely.
c) Slice the Fish:
- using a sharp knife, slice the fish into thin, uniform portions. preserve the knife at a slight attitude for clean cuts.
- The thickness of the fish must be proportionate to the size of the rice mound. aim for a balance of flavors and textures.
d) Serve and revel in:
- arrange the nigiri sushi on a platter or sushi plate.
- Serve with soy sauce and additional wasabi at the aspect for dipping.
- Nigiri sushi is quality loved right away after assembly to maintain the freshness of the fish and the texture of the rice.
Nigiri sushi is a testament to the splendor of simplicity in jap cuisine. With its sensitive stability of flavors, it offers a satisfying sensory enjoy. via following the suggestions mentioned on this blog and using the perfect gadget, you could create selfmade nigiri sushi that opponents the first-class of your favourite sushi eating place. So, gather your components, hone your knife competencies, and embark on a sushi-making journey. find out the artwork of nigiri sushi and indulge inside the natural pleasure of this exceptional culinary creation.
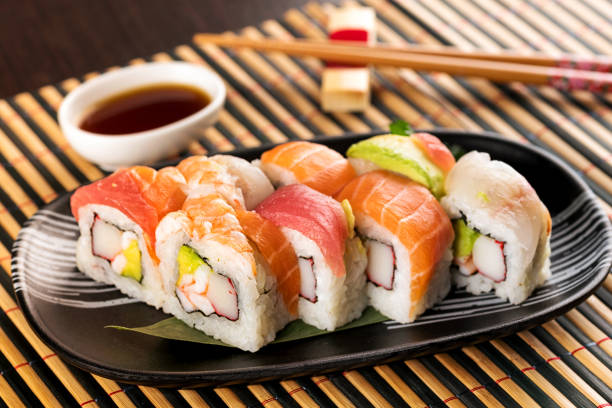
**2. Maki Sushi: The Colorful Rolls**
Maki sushi, or sushi rolls, are made by wrapping sushi rice and various fillings in a sheet of nori (seaweed). The rolls are then sliced into bite-sized pieces. Here are some popular types of maki sushi:
- California Roll: This popular roll typically includes crab meat, avocado, and cucumber. It's a great choice for sushi beginners.
- Spicy Tuna Roll: Made with a combination of chopped tuna, spicy mayonnaise, and sometimes other ingredients like cucumber or scallions, this roll offers a kick of heat.
- Vegetarian Roll: Filled with a variety of fresh vegetables like cucumber, avocado, carrots, and sprouts, this roll is a colorful and refreshing option.
**How To Make**
Maki sushi, also known as sushi rolls, is a popular and versatile form of sushi that combines a variety of ingredients wrapped in seaweed and rice. From classic rolls to creative combinations, maki sushi offers endless possibilities for flavor and presentation. In this blog, we will delve into the world of maki sushi, exploring tips on how to make it, the equipment used, and the step-by-step process. Get ready to embark on a sushi-rolling adventure and impress your friends and family with your homemade maki sushi creations.
**1. Equipments Used:**
a) Sushi Mat (Makisu): A bamboo sushi mat is essential for rolling the maki sushi. It helps create tight and even rolls.
b) Sharp Knife: A sharp, non-serrated knife is necessary for slicing the rolls into bite-sized pieces without crushing them.
c) Plastic Wrap or Bamboo Wrap: Wrapping the sushi mat with plastic wrap or using a bamboo wrap will prevent the rice from sticking to the mat.
**2. Ingredients:**
a) Sushi Rice: Sushi rice is the base of maki sushi. It is a short-grain rice seasoned with a mixture of rice vinegar, sugar, and salt.
b) Nori Seaweed Sheets: Nori is a type of edible seaweed that forms the outer layer of the sushi roll. It adds a slightly salty flavor and holds the ingredients together.
c) Fillings: Maki sushi can be filled with a variety of ingredients, such as fresh fish, cooked seafood, vegetables, and even fruits. Popular options include avocado, cucumber, crab sticks, shrimp, and salmon.
d) Sauces and Condiments: Soy sauce, wasabi, and pickled ginger are commonly served alongside maki sushi for dipping and enhancing the flavors.
**3. Step-by-Step Guide:**
a) Prepare the Sushi Rice:
- Rinse the sushi rice under cold water until the water runs clear.
- Cook the rice according to the manufacturer's instructions.
- Once cooked, transfer the rice to a large bowl and let it cool for a few minutes.
- In a small bowl, mix rice vinegar, sugar, and salt until dissolved.
- Drizzle the vinegar mixture over the rice and gently fold it in using a rice paddle, being careful not to mash the rice. Allow the rice to cool completely.
b) Assemble the Maki Rolls:
- Place a sheet of nori shiny side down on the plastic wrap or bamboo wrap on top of the sushi mat.
- Wet your hands with water to prevent the rice from sticking. Take a handful of sushi rice and spread it evenly over the nori, leaving a small border at the top.
- Arrange your chosen fillings horizontally along the center of the rice.
- Hold the edge of the sushi mat closest to you and start rolling it away from you, using the mat to shape the roll. Apply gentle pressure to ensure a tight roll.
- Continue rolling until the entire sheet of nori is wrapped around the fillings.
- Moisten the border of the nori sheet with water to seal the roll.
c) Slice and Serve:
- Using a sharp knife, dampened with water, slice the roll into bite-sized pieces. Aim for clean and even cuts.
- Arrange the maki sushi pieces on a serving plate and garnish as desired.
- Serve with soy sauce, wasabi, and pickled ginger on the side for dipping.
Maki sushi allows you to explore your culinary creativity and create personalized sushi rolls tailored to your taste preferences. With the right equipment, fresh ingredients, and a little practice, you can master the art of maki sushi and impress your guests with beautiful and delicious creations. Whether you stick to traditional combinations or experiment with unique fillings, the possibilities are endless. So, roll up your sleeves, gather your ingredients, and embark on a maki sushi-making adventure that will surely delight your taste buds and satisfy your sushi cravings. Enjoy!
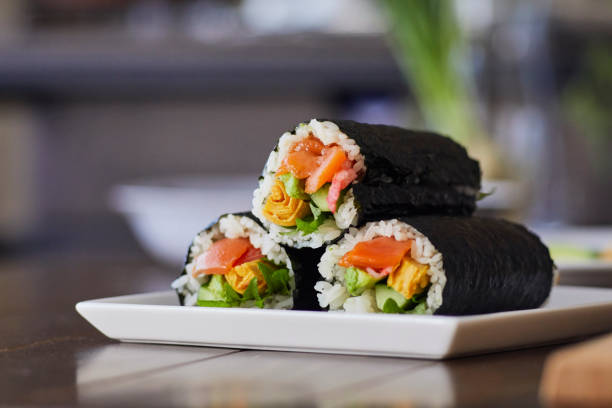
**3. Temaki Sushi: Hand-Rolled Delights**
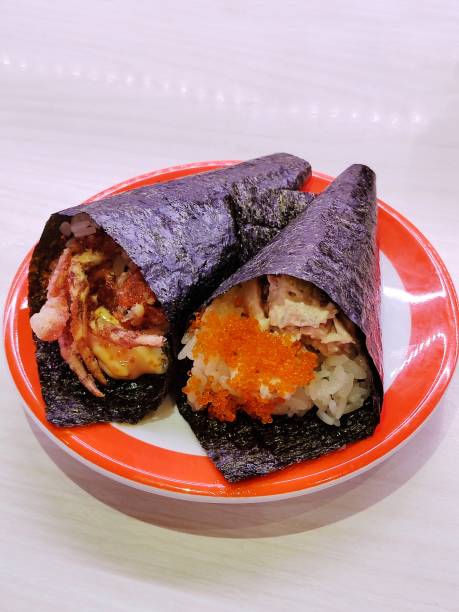
Temaki sushi, also known as hand rolls, are cone-shaped rolls made by wrapping nori around sushi rice and fillings. They are meant to be eaten with your hands, giving you a more interactive sushi experience. Some popular temaki sushi fillings include:
- Unagi (Grilled Eel): The rich, sweet flavor of grilled eel pairs perfectly with sushi rice and adds a unique twist to the hand roll.
- Tobiko (Flying Fish Roe): These small, vibrant orange eggs provide a burst of briny flavor and a satisfying texture.
- Avocado and Mango: For a refreshing and tropical twist, combining creamy avocado with sweet mango creates a delightful hand roll.
**1. device Used:**
a) Sushi Mat (Makisu): even as no longer vital for temaki sushi, a sushi mat can be helpful for shaping the seaweed wraps and retaining them together.
b) Sharp Knife: a pointy knife might be wanted for reducing the substances and slicing the sushi rolls.
c) Bamboo Wrap or Plastic Wrap: using a bamboo wrap or plastic wrap will prevent the rice from sticking to your arms and create a smoother rolling enjoy.
**2. substances:**
a) Nori Seaweed Sheets: Nori serves because the wrap for temaki sushi. it's miles crisp and provides a delightful umami flavor to the rolls.
b) Sushi Rice: Sushi rice is the foundation of temaki sushi. it's far a short-grain rice seasoned with a mixture of rice vinegar, sugar, and salt.
c) Fillings: Temaki sushi permits for a extensive variety of fillings. common alternatives include sparkling fish, along with tuna or salmon, avocado, cucumber, tempura shrimp, and thinly sliced vegetables.
d) Sauces and Condiments: Soy sauce, wasabi, and pickled ginger are usually served alongside temaki sushi for dipping and enhancing the flavors.
**3. Step-with the aid of-Step guide:**
a) put together the Sushi Rice:
- Rinse the sushi rice underneath bloodless water until the water runs clear.
- cook the rice consistent with the manufacturer's commands.
- once cooked, switch the rice to a huge bowl and let it cool for a few minutes.
- In a small bowl, mix rice vinegar, sugar, and salt till dissolved.
- Drizzle the vinegar combination over the rice and gently fold it in the use of a rice paddle, being cautious now not to mash the rice. allow the rice to cool absolutely.
b) collect the Temaki Sushi:
- location a sheet of nori on a flat surface, vivid side down.
- Moisten your hands with water to prevent the rice from sticking. Take a small handful of sushi rice and unfold it diagonally across the bottom nook of the nori, leaving a border along the edges.
- arrange your chosen fillings on top of the rice in a line across the center.
- begin rolling the nori from the lowest corner, the use of your hands to hold the fillings in place and shaping the roll into a cone shape.
- Moisten the pinnacle edge of the nori with water to seal the cone.
c) Slice, Dip, and enjoy:
- using a pointy knife, reduce the temaki sushi into bite-sized pieces.
- Serve the temaki sushi with soy sauce, wasabi, and pickled ginger on the aspect.
- To eat, honestly dip the temaki sushi into the soy sauce, take a chunk, and appreciate the aggregate of flavors and textures.
Temaki sushi offers a fingers-on and customizable sushi enjoy that is best for gatherings or casual food at home. With a few crucial elements and a chunk of practice, you can master the art of hand-rolling and create your personal delectable temaki sushi creations. So, collect your favored fillings, get innovative together with your taste mixtures, and revel in the freshness and excitement of temaki sushi. Bon appétit!
**B. Sashimi: The Essence of Freshness**
While not technically sushi, sashimi is a beloved Japanese dish that showcases the highest quality of raw fish or seafood. Served in thinly sliced pieces, sashimi allows you to savor the pure taste and delicate textures of the ingredients. Common types of sashimi include:
- Hamachi (Yellowtail): With its mild, buttery flavor and firm texture, hamachi is a prized choice for sashimi.
- Ikura (Salmon Roe): These plump, orange orbs burst with a briny taste, adding a burst of flavor to every bite.
-Hotate (Scallop): Sweet and tender, scallops make for a delectable sashimi option.
A: Hamachi:

Hamachi, also known as yellowtail, is a prized fish in Japanese cuisine. With its buttery texture and rich flavor, it is a favorite among sushi enthusiasts and seafood lovers. In this blog, we will delve into the world of Hamachi, sharing tips on how to prepare and serve it, the equipment needed, and some delicious recipes to try. Get ready to discover the exquisite taste of Hamachi and elevate your culinary repertoire.
**1. Understanding Hamachi:**
Hamachi refers to the yellowtail fish, specifically the yellowtail amberjack species found in the Pacific Ocean. It has a firm yet tender flesh with a high fat content, giving it a rich and buttery taste. The flavor profile of Hamachi is often described as delicate, slightly sweet, and succulent.
**2. Equipment Used:**
a) Sashimi Knife: A sharp and precise sashimi knife is essential for slicing Hamachi into thin, uniform pieces.
b) Cutting Board: A sturdy and clean cutting board provides a stable surface for handling the fish.
c) Sushi Mat (Makisu): While not necessary for preparing Hamachi, a sushi mat can be useful if you choose to roll the fish into sushi rolls.
**3. Selecting and Preparing Hamachi:**
a) Freshness: When selecting Hamachi, look for firm flesh, bright and clear eyes, and a fresh ocean smell. If possible, purchase sushi-grade Hamachi from a reputable fishmonger.
b) Filleting and Slicing: Rinse the Hamachi fillets under cold water and pat them dry with a paper towel. Using a sharp sashimi knife, slice the fish against the grain into thin, even slices. Take care to maintain a consistent thickness to ensure an enjoyable texture.
**4. Serving Suggestions:**
a) Sashimi: Hamachi shines when served as sashimi, allowing its delicate flavor and texture to take center stage. Arrange the slices on a clean platter or individual plates and serve them with soy sauce, wasabi, and pickled ginger for dipping.
b) Sushi Rolls: Incorporate Hamachi into your homemade sushi rolls for a delightful combination of flavors. Use nori seaweed sheets, sushi rice, and your favorite fillings to create Hamachi maki rolls. Experiment with combinations like cucumber, avocado, and Hamachi for a refreshing and satisfying roll.
c) Nigiri Sushi: Create elegant nigiri sushi by placing a small mound of sushi rice on your palm and gently pressing a slice of Hamachi on top. Add a touch of wasabi between the rice and the fish to enhance the flavor.
**5. Recipe: Hamachi Poke Bowl:**
Ingredients:
- Fresh Hamachi, cubed
- c
- Mixed salad greens
- Avocado, sliced
- Cucumber, sliced
- Edamame beans
- Sesame seeds
- Soy sauce
- Lime juice
- Sesame oil
- Scallions, chopped
- Nori strips (optional)
- Pickled ginger (optional)
Instructions:
1. Prepare the sushi rice according to the package instructions and let it cool to room temperature.
2. In a bowl, combine the Hamachi cubes, soy sauce, lime juice, sesame oil, and scallions. Let it marinate for 10-15 minutes.
3. Assemble your poke bowl by layering the sushi rice, mixed salad greens, avocado, cucumber, and edamame beans.
4. Top the bowl with the marinated Hamachi cubes and sprinkle with sesame seeds.
5. Garnish with nori strips and pickled ginger, if desired.
6. Drizzle with additional soy sauce and lime juice for extra flavor.
7. Toss the ingredients together before enjoying the vibrant and delicious Hamachi poke bowl.
Hamachi, with its delicate flavor and velvety texture, offers a memorable dining experience. Whether enjoyed as sashimi, incorporated into sushi rolls, or showcased in a poke bowl, this prized fish is a testament to the culinary artistry of Japanese cuisine. By following the tips provided and exploring the recipes, you can savor the exquisite taste of Hamachi from the comfort of your own kitchen. Indulge in the magic of yellowtail and elevate your dining experience with this exceptional ingredient. (Scallop): Sweet and tender, scallops make for a delectable sashimi option.
B: Ikura:
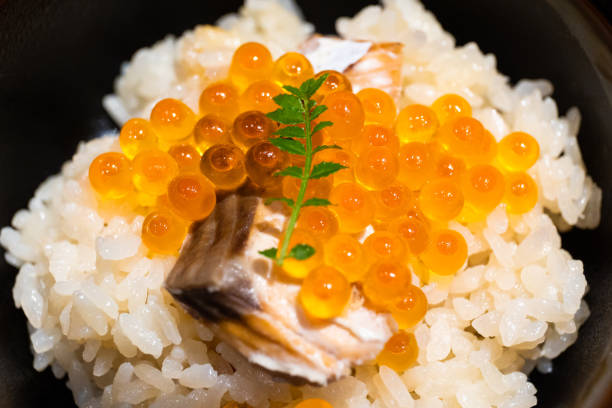
Ikura, also known as salmon roe, is a prized ingredient in Japanese cuisine. With its vibrant orange color, pop-in-your-mouth texture, and briny flavor, Ikura adds a burst of excitement to various dishes. In this blog, we will delve into the world of Ikura, sharing tips on how to prepare and serve it, the equipment needed, and some delicious recipes to try. Get ready to discover the exquisite taste of Ikura and elevate your culinary repertoire.
**1. Understanding Ikura:**
Ikura refers to the roe (eggs) of salmon, particularly the salted or marinated variety. It is known for its plump, glistening appearance and rich umami flavor. The eggs have a distinct texture with a thin outer membrane that bursts with flavor when eaten.
**2. Equipment Used:**
a) Fine-Mesh Strainer: A fine-mesh strainer is essential for separating the Ikura from excess liquid or marinade.
b) Mixing Bowl: Use a mixing bowl to gently toss the Ikura with the desired seasonings or marinade.
c) Serving Spoon or Chopsticks: A serving spoon or chopsticks can be used to handle and serve Ikura.
**3. Selecting and Preparing Ikura:**
a) Freshness: When selecting Ikura, look for plump, firm, and shiny eggs. Fresh Ikura should have a mild oceanic scent. Purchase Ikura from a reputable fishmonger or seafood market to ensure its quality.
b) Cleaning and Straining: Rinse the Ikura gently under cold water to remove any excess salt or preservatives. Place the Ikura in a fine-mesh strainer and gently shake or tap to remove excess liquid.
**4. Serving Suggestions:**
a) Nigiri Sushi: One of the most popular ways to enjoy Ikura is on nigiri sushi. Prepare bite-sized portions of sushi rice and gently press a small mound onto each slice. Top the rice with a generous amount of Ikura, allowing the eggs to rest naturally on the rice.
b) Sushi Rolls: Incorporate Ikura into your homemade sushi rolls for a delightful burst of flavor. Combine it with ingredients like cucumber, avocado, and crabstick for a delicious and vibrant roll.
c) Donburi: Create a beautiful and flavorful Ikura donburi by layering a bowl of sushi rice with a generous amount of Ikura. Add additional toppings like sliced cucumber, seaweed, and pickled ginger to enhance the taste and presentation.
**5. Recipe: Ikura and Avocado Toast:**
Ingredients:
- Fresh Ikura
- Sourdough bread, toasted
- Ripe avocado
- Lemon juice
- Salt and pepper
- Microgreens or sprouts (optional)
- Red onion slices (optional)
Instructions:
1. Mash the ripe avocado in a bowl and season it with a squeeze of lemon juice, salt, and pepper.
2. Spread the avocado mixture generously on the toasted sourdough bread.
3. Top the avocado toast with a generous amount of Ikura, allowing the eggs to rest on the avocado.
4. Garnish with microgreens or sprouts for added freshness and red onion slices for a hint of sharpness.
5. Serve the Ikura and avocado toast as a delightful and flavorful breakfast or brunch option.
Ikura, with its vibrant color, distinct texture, and briny flavor, is a true delicacy in Japanese cuisine. By following the tips provided and exploring the recipes, you can savor the exquisite taste of Ikura in various dishes. Whether enjoyed on nigiri sushi, incorporated into sushi rolls, or used as a topping for avocado toast, Ikura adds a touch of elegance and indulgence to any meal. Embrace the culinary adventure and discover the joys of Ikura.
C: Hotate:

Hotate, normally called scallops, is a delectable and versatile seafood option that has earned a special place in culinary traditions around the arena. With its sensitive texture, candy taste, and versatility, scallops can be prepared in diverse methods to create outstanding dishes. in this weblog, we are able to explore the wonders of Hotate, providing recommendations on how to prepare and cook dinner them, the equipment needed, and some scrumptious recipes to attempt. Get geared up to embark on a culinary journey and increase your seafood cooking skills with Hotate.
Hotate, or scallops, are a form of bivalve mollusk located in oceans global. they have got a unique shell with a fanned appearance and a gentle, candy flesh. Scallops are noticeably prized for his or her delicate taste and gentle texture.
**2. gadget Used:**
a) Skillet or Pan: A skillet or pan is essential for cooking scallops at the stovetop.
b) Tongs: Use tongs to flip and take care of the scallops gently even as cooking.
c) Chef's Knife: a sharp chef's knife is wanted for cleansing and trimming the scallops.
**3. choosing and getting ready Hotate:**
a) Freshness: when shopping scallops, look for ones which might be firm, vivid, and odorless. keep away from scallops with a slimy texture or a sturdy fishy odor.
b) cleaning: Rinse the scallops below bloodless water to remove any grit or sand. Pat them dry with a paper towel earlier than cooking.
c) Trimming: if your scallops nevertheless have the hard muscle connected (known as the "foot"), eliminate it by gently pulling it faraway from the scallop. Discard the muscle as it can be hard and chewy.
**4. Cooking strategies:**
a) Pan-Seared Scallops: heat a skillet or pan over medium-high warmth and upload a small quantity of oil or butter. as soon as hot, area the scallops inside the pan and cook dinner for two-three minutes on every facet till golden brown and cooked through. Be careful not to overcrowd the pan, as it can save you right browning.
b) Grilled Scallops: Preheat the grill to medium-high warmth. Thread the scallops onto skewers or use a grilling basket to save you them from falling via the grates. Grill for 2-3 mins on each side until cooked and gently charred.
c) Baked Scallops: Preheat the oven to 400°F (200°C). place the scallops in a baking dish and drizzle them with olive oil or melted butter. Season with salt, pepper, and any desired herbs or spices. Bake for 10-12 minutes till opaque and cooked thru.
**5. Recipe: Lemon Garlic Butter Scallops:**
Ingredients:
- fresh scallops
- Butter
- Garlic cloves, minced
- Lemon juice
- Salt and pepper
- clean parsley, chopped (optional)
Instructions:
1. Pat dry the scallops with a paper towel and season them with salt and pepper.
2. warmth a skillet over medium-excessive heat and melt the butter. add the minced garlic and sauté for approximately 1 minute till aromatic.
3. cautiously add the scallops to the skillet, making sure they have got sufficient area between them. cook dinner for two-3 minutes on every facet until golden brown and cooked thru.
4. Squeeze fresh lemon juice over the scallops and sprinkle with chopped parsley for brought freshness.
5. Serve the Lemon Garlic Butter Scallops straight away as an appetizer or principal dish, observed with the aid of a side of veggies or a salad.
**6. appropriate events:**
Hotate (scallops) may be loved on various occasions, along with:
- Romantic dinners
- unique celebrations
- Seafood-themed events
- Date nights
- gourmand cooking experiments
**7. Cooking Time:**
The cooking time for Hotate depends on the chosen method and the size of the scallops. usually, scallops cook fast and have to handiest take a couple of minutes in step with aspect. Pan-seared scallops normally take approximately four-6 mins in general, whilst baked or grilled scallops may additionally require 10-12 minutes.
Hotate, or scallops, are a culinary pleasure that adds beauty and flavor to any seafood dish. whether or not pan-seared, grilled, or baked, scallops offer a gentle and candy experience for seafood lovers. via following the tips and techniques referred to on this blog, you may optimistically cook dinner Hotate and explore numerous recipes that showcase their herbal deliciousness. So, seize a few fresh scallops, placed on your chef's hat, and revel in the pleasant journey of cooking with Hotate.
Presentation:
Sashimi is commonly served as a fantastically arranged platter, often followed by way of shredded daikon radish, shiso leaves, or seaweed garnishes. Soy sauce and wasabi are supplied on the facet, permitting diners to beautify the flavors in line with their choice.
While sushi and sashimi each exhibit the freshness of seafood, they provide wonderful reports. Sushi presents a harmonious combination of vinegared rice, seafood, and other components, creating a numerous variety of flavors and textures. alternatively, sashimi presents a natural and unadulterated taste of the seafood, celebrating its natural essence.
Whether you're a fan of sushi's intricate rolls or sashimi's minimalist beauty, each dishes exemplify the artistry, precision, and attention to element that jap delicacies is renowned for. So, the following time you go to a Japanese eating place, include the opportunity to get pleasure from each sushi and sashimi, immersing your self within the wealthy tapestry of flavors that these culinary delights have to offer.